As an insulation contractor operating in the Southeast, we frequently perform retrofit work for uncomfortable homeowners. For decades, the most common impetus for such work has been an air conditioner that struggles to keep up with the summer heat. This year, we’ve gotten calls arising from a new complaint: indoor humidity. While heat-related issues rarely impact more than comfort, humidity issues add the potential for biological growth and the hassle that comes with it.
This article details two projects my company undertook this year to control indoor humidity for homeowners who were sweating—literally and figuratively—their homes’ performance. Each took a somewhat different path, but the overall theme is the same: Keep as much humidity out of the house as possible, then make sure the mechanicals can handle what’s left. Solving elevated indoor humidity often involves multiple trades and, ideally, the effort is led by someone who approaches the home as a system and understands how each of its parts interacts with the others.
Keep in mind that the context I’m speaking from is that of warm-humid climate zone 3 during the humid season. We’re often taught about building performance from a cold-climate perspective, as much of that knowledge in North America originates in New England and Canada. While the laws of physics don’t change, a mental shift is required to translate those physics to southerly climes, where a long and humid air-conditioning season dominates. Northerners as well as Southerners can benefit from this understanding, especially with the increase of humidity and air conditioning loads moving north as climate trends shift.
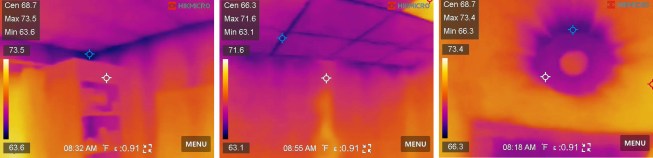
Running a blower door while scanning with a thermal camera reveals where cooler, outdoor air is leaking through the structure. These examples show air leaks from the attic through top plates (left), through the basement ceiling (center), and around a recessed ceiling light (right).
Case 1: 1997 Suburban Single-Family
By the time I came onto the scene, four HVAC contractors, another insulation contractor, and a roofer had all tried and failed to control indoor humidity in this 4,000-square-foot, six-bedroom home that struggled to maintain indoor relative humidity under 70% despite the five (count ’em, five) dehumidifiers operating throughout the house. Two of those dehumidifiers were commercial-grade units, with one integrated into the main-level HVAC duct system. These accompanied other failed measures such as adding attic insulation (without air sealing), recommissioning an old, disconnected attic fan (which led to condensation on basement ductwork), removing that attic fan, installing a portable air conditioner in the pantry, messing with HVAC fan speed and filter configurations, and doing a bit of misguided air sealing in the garage.
One HVAC contractor told the owner that she would need to spend five figures replacing one of her duct systems. When I met her, the owner was near her wits’ end, and nearly her bank account’s as well, and was fatigued by the muggy indoor feel and the regular need to spray down little bits of biological growth emerging from behind switch plates in certain rooms. She was also understandably confused by the conflicting voices she had heard up to that point.
To borrow a maxim from the medical field: “Prescription without diagnosis is malpractice.” Unfortunately, another maxim, “shoot first and ask questions later (or never),” summarizes the default approach for many in our industry. I knew that developing a solid plan would be critical to help this contractor-weary homeowner move forward, because she needed her next spend to be her last. Using a diagnostic process would cut through the noise and guide next steps based on data—the ingredient missing from everyone else’s recipes.
With building forensic expert Corbett Lunsford acting remotely as a neutral third-party consultant, I spent a day inspecting and gathering relevant data about the home’s envelope and mechanical systems. There are only so many sources of moisture inside a building. A thorough top-to-bottom inspection of the home quickly ruled out rain leaks, plumbing leaks, groundwater, and unusual occupant behavior, leaving outdoor humidity as the only possible source. Outdoor humidity’s primary entry mode is air leakage, so we knew we were on the hunt for leakage pathways and pressures.
Leakage pathways. Using a blower door and thermal camera, we quickly verified the common leaks we expected to see. These mainly involved attic air leakage across the ceiling of the upper level through drywall and framing joints and penetrations.
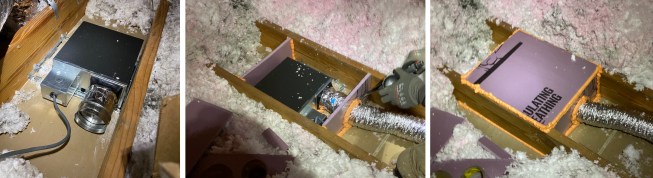
This process also pinpointed some less obvious yet egregious sources of leaks. One was a bathroom exhaust fan that lacked a backdraft damper. The owner had been battling acute humidity buildup as well as an unusual number of oriental beetles in the bathroom that contained this fan, and she needed to empty the reservoir of a standalone dehumidifier in that room more frequently than the others in the house. This fan was the source of the humidity. Pulling the trim piece off revealed biological growth and insect bits on the back. Pulling the fan guts out of the housing revealed a discharge port completely open to the framing cavity, with a poorly installed insulation batt visible through the opening. Such a hole has the same effect as leaving a window cracked 24/7.
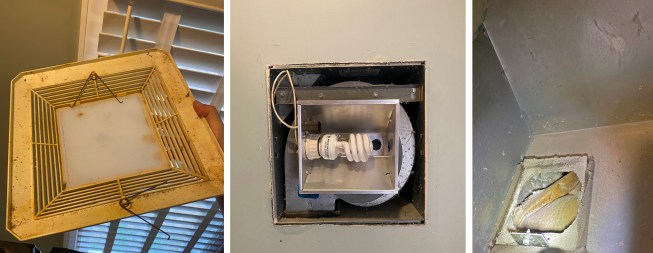
Pulling the trim off a bathroom fan/light (left) revealed biological growth and insect bits on the back. After removing the light (center) fan motor, the author discovered a discharge port completely open to the framing cavity (right).
Another major source of leakage we discovered was along the rim of the daylight basement. This house has wood lap siding from the rim joist up, and brick veneer from the rim joist down. The two claddings are flush to each other—a condition allowed by the wood floor frame being built proud of the poured concrete foundation. This is a common configuration for daylight basements in our area. The sill plate rests on the foundation, but the joists cantilever a few inches past it, creating an air gap between the sill plate and the rim joist. This gap connects the entire floor diaphragm to a curtain of outdoor air found between the foundation wall and the back of the brick veneer.
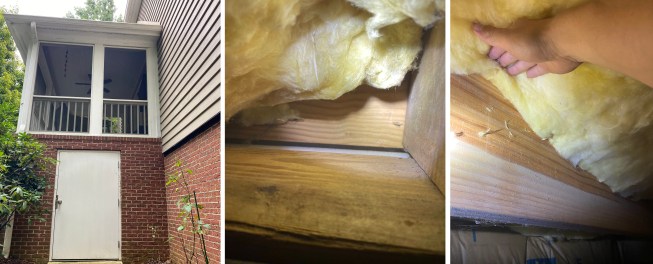
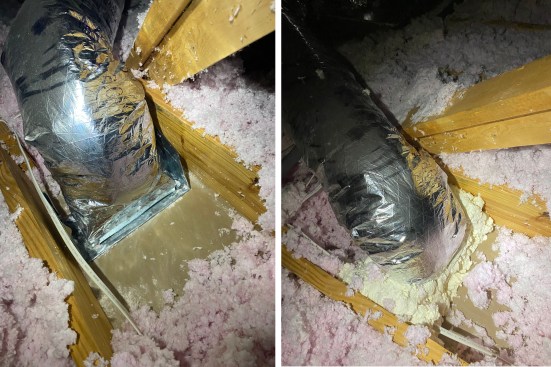
To align the brick veneer with the lap siding (left), the floor joists cantilevered past the foundation a few inches, creating a gap (center) between the sill plate and the rim joist. This allowed humid outdoor air to leak into the floor cavity and a thin, white haze of biological growth to form on the framing and insulation (right).
To access leaks in the rim joist area, the crew opened the tray ceiling in the living room.
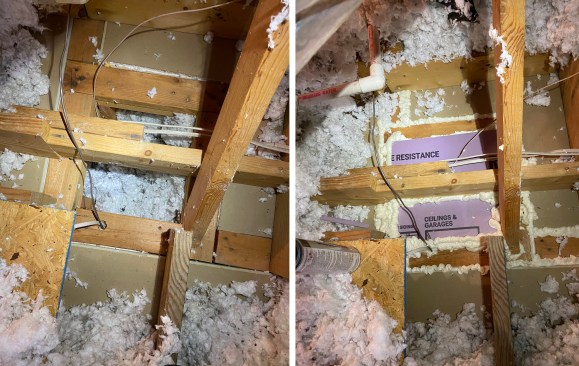
That outdoor air, along with the humidity it contains in the summer, provided the moisture source for the basement duct condensation that arose when the attic fan was recommissioned. Attic fans in leaky homes tend to create suction indoors. This house relieved that suction in part by pulling outdoor air in through this framing gap—enough to elevate the basement dew point above the surface temperature of the cold ductwork, resulting in condensation on the duct surfaces. A visual scan of the floor system above the finished basement’s tile grid ceiling revealed other signs of air infiltration and elevated humidity, including the telltale dark discoloration on insulation batts close to the perimeter and a thin haze of biological growth widely distributed on the insulation and framing.
Pressures. Turning the blower door off and carrying the manometer around the house, we turned our attention to air pressure. Air leakage requires not only a pathway but also a pressure to act as a driving force. The air pressure we cared about was from outside to inside, and the manometer detected and verified that the house was frequently under suction due to several forces. One was natural pressure created by the indoor-outdoor temperature difference. There was a light degree of air movement from the attic to the upper level due to the temperature difference between the cool air mass of the air-conditioned interior and the hot air mass outdoors. Cooler, denser air tends to sink and leak out through low places in the building, forcing the indoors to replace it by drawing outdoor air in through high places, like the upstairs ceiling. You probably know this as “stack effect.”
We’re often taught about stack effect as being primarily upward, which is the case during the heating season and the origin for the often repeated but inaccurate saying that “heat rises.” During the cooling season, that dynamic reverses. Cold air draining out the bottom of the building pulls hot air in from the top, a process called the “reverse stack effect.”
But stack pressure, though meaningful, is relatively weak and is easily overpowered when fans are turned on. The attic-mounted HVAC system serving the upper level created forced suction that outweighed natural stack pressure. This is because more air leaked out of the duct system’s supply side into the unconditioned attic than leaked into the return side. This imbalance in leakage creates suction as the blower fan pulls more air out of the house at the return than it gives back through the supply. The house balances this deficit by sucking outdoor air in through the pathways outlined above.
The other primary offender was the portable AC unit in the pantry, which was required because the pantry lacked a duct from the central system. These appliances are effective at cooling small spaces. However, they also function as one-way air movers that exhaust air out of the house. This one-way exhaust was an important source of the negative pressure of the indoor space.
By turning various fan appliances on and off independently, we used the manometer to quantify and prioritize the sources of suction created in the house. Other sources included the clothes dryer and bathroom exhaust fans, but these were a lower priority because they operated only intermittently. The upstairs HVAC and portable air conditioner ran a lot and created the strongest pressures and so were the main reasons this house sucked humid air in from outdoors.
Mechanicals. On examining the mechanical systems, we noted that the home’s two central air conditioners (one for the upstairs and another zoned system for both the main level and basement) were likely oversized at an average of around 533 square feet per ton of cooling capacity. Rather than calculating the load, many HVAC contractors use a guideline of 500 to 600 square feet per ton when selecting equipment, but this approach is coming to be considered out of date and usually results in oversized systems. One unintended consequence of too much cooling capacity is insufficient dehumidification. Such a system will satisfy the thermostat so quickly that it doesn’t cycle air long enough to pull much moisture out.
We also discovered that the whole-home dehumidifier was not wired to call the blower fan when the air conditioner wasn’t running. The dehumidifier’s intake pulled from the HVAC return trunk, with its discharge ducted into the HVAC supply trunk. Without command of the blower fan, the dehumidifier’s intake sucked its discharge air backward across the air handler, resulting in a short-circuit loop that prevented dehumidified air from being distributed to the rest of the house. Because the AC was oversized, the blower fan didn’t operate as often as it needed to, so the dehumidifier mostly dehumidified about 10 linear feet of trunk line.
Recommendations. With Corbett’s wisdom and experience, we interpreted these findings and came to some conclusions. In summary, this house sucked in humid outdoor air whenever the upstairs HVAC or pantry AC cycled on. And whenever they were off, natural pressure took over and brought attic air into the upstairs as conditioned air escaped out of the lowest level. The standalone dehumidifiers acted like overwhelmed bilge pumps in a leaky boat, diligently bailing the house out but not addressing the problem’s source.
Armed with data proving the reasons for this home’s high humidity, we could then confidently make the following recommendations to fix it:
- Air seal the attic floor.
- Air seal walls separating upstairs rooms from small side attics.
- Air seal floor-joist cavities open to side attics in plane with knee walls.
- Air seal the air gap along the perimeter of the basement rim joist.
- Add upgraded backdraft dampers on all bathroom exhaust fans.
- Seal the upper-level duct system.
- Decommission the portable AC in the pantry and install a new branch from the central system to serve this room instead.
- Disconnect the whole-home dehumidifier from the main-level system and relocate it to serve the upper level instead.
- Verify the actual cooling load and replace HVAC units with right-sized equipment.
Air sealing the attic and the basement rim joist and upgrading bath-exhaust-fan dampers would prevent some humid outdoor air from entering the building in the first place, thereby lightening the dehumidification load at the source. Sealing the upper-level duct system and decommissioning the portable AC would reduce the amount of indoor suction pulling that outdoor air in. Finally, relocating the whole-home dehumidifier would place the paid-for appliance more appropriately upstream of the humidity’s general top-down path through the building, and right-sizing the HVAC equipment would enable the mechanical systems to more thoroughly handle the building’s latent load and create energy savings to boot.
Work performed. Ultimately, the homeowner had to draw a line with her budget. She wisely prioritized source control and elected to move forward with everything except relocating the whole-home dehumidifier and replacing the HVAC units. So, we got to work.
We tag-teamed this project with a trusted local HVAC contractor that understands the systemic dynamics in a building and the HVAC trade’s impact on them. Its workers came in first to seal the ducts using the Aeroseal system, a highly efficient and effective method that pressurizes the duct system and forces an aerosolized sealant into leak points. This system is capable of duct sealing as close to perfection as anything in this world can be. By sealing from the inside, it can also reach joints that might otherwise be inaccessible to a worker sealing from the outside using mastic and tape.
Once that was complete, the HVAC crew wired the whole-home dehumidifier to run the air handler’s blower fan when dehumidification is called for but air conditioning isn’t. That way, dehumidified air would be mixed and distributed by the HVAC ductwork to the entire main level and basement of the house. The crew also added a backdraft damper where the dehumidifier’s discharge entered the HVAC supply trunk. This prevents the backward looping of air across the dehumidifier when the air conditioning is running but the dehumidifier isn’t.
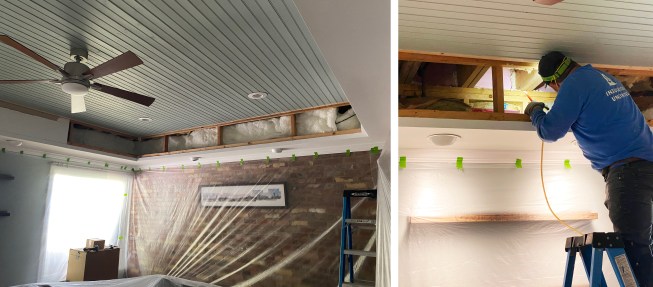
Then it was our turn. The homeowner wanted to take advantage of this opportunity to update her upstairs bathroom exhaust fans, since they were nearly 30 years old and were about to be sealed into place and buried in fresh insulation. We installed new Panasonic units and added Fantech RSK backdraft dampers as well.
The author added Fantech RSK dampers to new Panasonic bath fans (left) to help reduce backdrafting. With the new fans and dampers in place, the crew sealed the fan units (center) by taping them to the drywall underneath and enclosing them in the attic with air-sealed boxes made from rigid foam board (right).
I like this damper style because it uses a light spring to hold butterfly flaps against a gasket. In my own testing, I’ve found that the factory dampers on most builder-grade bath fans are designed to stay slightly open until sufficient pressure makes them close. I’ve been able to backdraft such dampers with up to 2 pascals of pressure, at a flow rate of 10 to 11 cfm. For reference, the combined pressure effect from the HVAC and portable AC in this home was about -0.8 pascals, enough pressure to sneak air past these dampers without closing them. The Fantech dampers don’t allow any backdrafting at all and have become my go-to. Once the new fans and dampers were in place, we air sealed the bath-fan units by both taping them to the drywall underneath and enclosing them with air-sealed boxes made from rigid foam board on the attic side.
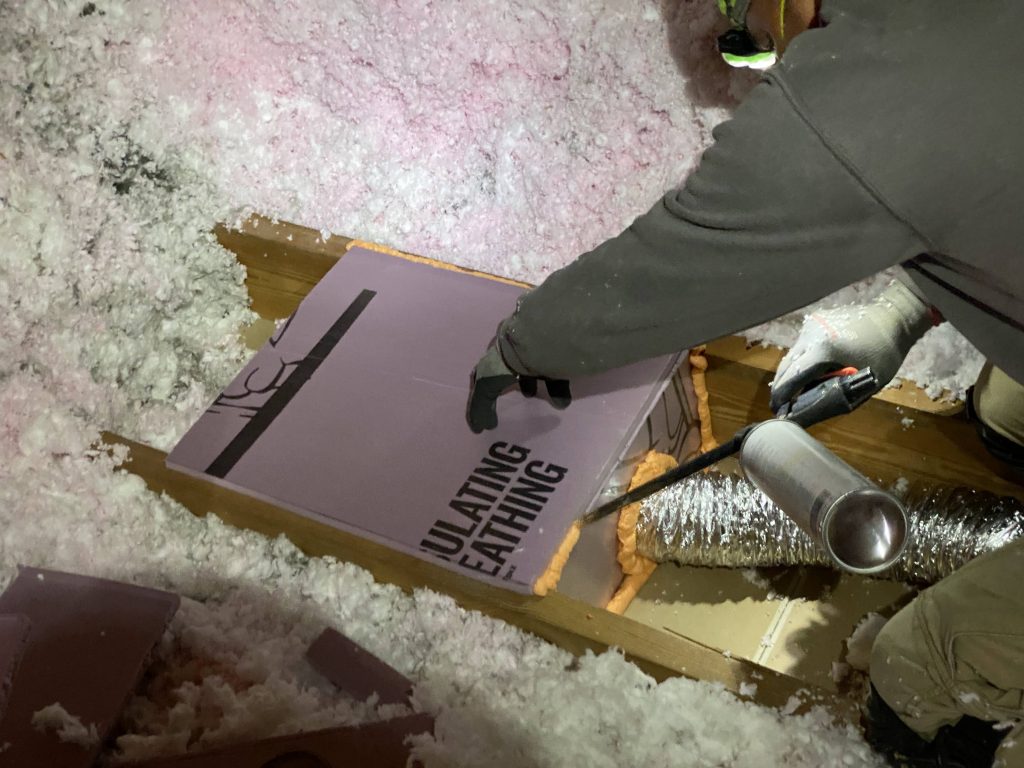
To maximize access to the attic floor for air sealing, we then had to take up several sheets of OSB that had been used as a storage platform. While we proposed removing all the existing attic insulation to fully expose all joints and penetrations, the cost of this combined with the amount of new insulation that would be required afterward exceeded the owner’s budget. So, we dug and swam our way through the 20 inches plus of fiberglass insulation the previous insulator had blown to find and seal all the joints and penetrations we could physically touch.

The crew sealed all wall plates and penetrations in the attic.
We discovered multiple open chases functioning like windows open to the attic 24/7, as well as the “usual suspects,” such as top-plate-to-drywall joints and electrical and plumbing penetrations through plates and drywall. All were sealed using canned foam.
In the attic of the 1997 home, a small, open chase (left) created a leak equivalent to having a window open to the attic 24/7. The crew sealed this opening with rigid foam and canned spray foam (right).
The pull-down stair access had a zippered hood installed by the previous insulator. Though there are ways to construct a more airtight and better insulated cover over these notoriously leaky ladders, we kept the original one in place for budgetary reasons.
To access the side attics beside the upstairs rooms, we cut ports in the garage ceiling. We discovered what we expected: bare insulation batts in the walls adjacent to these attics. Some had a bit of sheathing, but most did not. We sealed the joints in the OSB where present and tied in an airtight housewrap detailed at the joints and edges for air barrier continuity. Rigid foam would have added some thermal resistance to these locations had the budget allowed.
We also discovered some joist cavities connecting these spaces to the floor diaphragm beneath the adjacent upstairs rooms. We sealed these cavities using blocks of rigid foam in line with the walls above.
The air gap along the basement perimeter was mostly accessible through a tile grid ceiling, but one large living room had a drywall tray ceiling detail that required some demolition. This demo and associated refinishing was deemed worthwhile because about 35% of the gap lay behind it, a big enough share of an important enough air leak. Access is tough in such locations, and the approach we landed on was to cut and cobble rigid foam blocks in such a way that we could reach their edges with canned foam guns.
Once we handled that detail, that room could be put back together. I usually advise clients that demoing finishes for the sake of insulation work is not cost effective, but, in this case, establishing control over indoor humidity justified it—though 90% of the time and cost of sealing this area went toward patching, finishing, and painting drywall.
We performed the diagnostic work at the end of last year’s humid season and performed the remediation work in the following spring. I’m pleased to report that the owner was able to remove three of her standalone dehumidifiers, and the house maintained indoor relative humidity levels below 70%—mostly around the high 50s with the occasional short spike into the 60s—all summer long. The whole-house dehumidifier on the main level remains, and she may have us relocate it next season. Another smaller, commercial-grade dehumidifier remains operational in the basement, though the client left it in place mainly because it was expensive and already paid for. Next season, we will experiment with turning it off. For now, the owner says she is “so happy, she could cry.” We don’t expect her tears to contribute enough moisture back to the home to warrant remediation.
Case 2: 2022 Townhouse
Not long after we completed the project above, another homeowner across town dealing with a similar problem called us. In her case, the first summer after occupying her 2022 attached townhouse, a rash of biological growth developed on indoor contents and surfaces and required extensive cleaning. The builder wasn’t much help, and neither were other tradespeople she contacted. She was running a standalone dehumidifier and had placed desiccant bags throughout the home to get by until she could find a solution that didn’t require constantly emptying reservoirs and replacing bags.
We followed the same diagnostic process as outlined in the previous case, though this 1,400-square-foot, single-level, two-bed townhouse on a slab was much simpler, with less to inspect. In this case, air leakage through the expected pathways was the main culprit.
Zonal pressure diagnostics (ZPD) clued us in to especially high air leakage in the rooms adjacent to the attached garage. ZPD uses a blower door and manometer to gauge the relative degree of leakiness to outdoors on a room-by-room basis (see “An Introduction to Zonal Pressure Diagnostics” by Randy Williams, May/23).
The mechanical system was grossly oversized at 3 tons of cooling capacity for this relatively small home, especially considering that the entire rear wall faced an adjoining unit, contained no glass, and accounted for almost zero load. That’s even more capacity than the guideline of 500 to 600 square feet per ton would yield. What’s more, duct leakage created 1.5 pascals of negative pressure indoors, enough to suck in a meaningful amount of outdoor air given an envelope not much tighter than the maximum of 7 ACH50 in force for new construction in our area.
For this owner, we recommended a similar, yet simpler, approach in a “good-better-best” presentation. The “good” approach simply proposed installing a whole-home dehumidifier. The “better” approach paired that with envelope and duct sealing. The “best” approach included envelope and duct sealing, and instead of a dehumidifier, we called for a full HVAC equipment replacement with right-sized indoor and outdoor units, with the caveat that we should then monitor conditions for a time to see whether adding a whole-home dehumidifier would be smart.
This owner selected the “best” approach, choosing to scrap her three-year-old HVAC equipment in favor of new. It’s a bit daunting when someone takes your expensive advice, but we felt confident given the opportunity for improvement the data showed us.
Again, we tag-teamed the project with our local HVAC contractor, which again sealed the ducts using the Aeroseal system and performed a careful room-by-room load calculation to size the new equipment. The company ended up replacing the old 3-ton, single-stage system with a 2-ton, two-stage system. Two-stage means that its maximum capacity is 2 tons, but it has a lower-capacity stage (closer to 1 ½ tons) that it can run when demand isn’t at full extreme. In that stage, the unit will cool slower and run longer, which we like because longer run times mean more dehumidification. So, while the old single-stage system ran at 100% of its 3-ton capacity every time it turned on, the new system can more appropriately match its output to the requirements of the building by choosing between full capacity or reduced capacity. Notably, its high stage is two-thirds, and its low stage half, of the old system’s capacity.
In the 2022 townhouse, the author’s crew air sealed around the HVAC supply boots with canned foam. In addition, the ducts themselves were sealed by the HVAC contractor using the Aeroseal system.
We followed up with the same attic air sealing work as in the first project, including upgraded backdraft dampers on bath fans. While there was no basement or side-attic work on this project, we did take special care to air seal the garage separation wall because of the higher degree of leakage we measured in the adjoining rooms.
You might be surprised by how much air can pass across a garage separation wall. In our area, this wall is typically no more than drywall on either side of 2×4 studs filled with fiberglass batts. Meaningful joints running all along the top and bottom of the drywall let garage air pass easily between the drywall and wall plates on its way in or out of the house. Usually, there’s also a wavering gap under the bottom plate due to waves in the slab. (The owner shared an anecdote about one of her neighbors who cleaned his garage out with a leaf blower, only to discover garage dirt on indoor floors all along the base of the separation wall.) Finally, because the door unit for house entry is usually installed during trim-out, weeks after the insulation sub has already come and gone with their foam guns, it’s almost never air sealed to the framing.
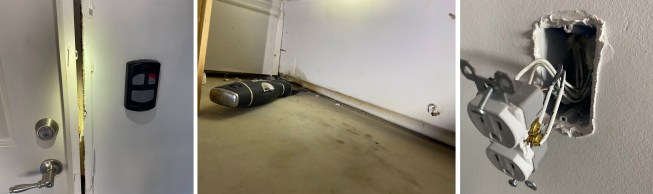
Leaks through the garage separation wall are common: The door (left) is typically trimmed after the insulation crew has left, and the gap under the bottom plate (center) rarely gets sill seal. Outlets can be sealed to drywall with caulk (right); wires inside the box must also be sealed.
Sealing this wall involved first removing baseboard, door casing, and a receptacle plate from the garage side of the wall. Then we created an air barrier out of the drywall, using canned foam to seal it to the slab and door jamb and using caulk to seal the receptacle box knockouts and drywall cutout. We reinstalled the trim pieces into their original locations, and after a bit of cosmetic caulk, it was hard to tell that anything had happened.
After we sealed the envelope to prevent humid outdoor air infiltration, sealed the ductwork to reduce indoor suction, and right-sized the mechanicals to most appropriately handle the latent load, this townhouse maintained relative humidity below 60% for the second half of the summer without needing the standalone dehumidifier and desiccant bags. This meant the homeowner was able to take an extended, stress-free trip out of town without relying on a neighbor to empty the dehumidifier reservoir every day.
When I visited the home to take follow-up measurements after the end of this year’s humid season, she gave me a big hug and said, “You have no idea how much taking care of this has helped my mental health.” One’s home should be a refuge, not a threat, and eliminating this humidity problem changed hers into the sanctuary it needed to be.