A recent project began as a straightforward interior renovation of a small guest house on Cape Cod. As is often the case, the scope expanded once the work got underway.
I informed the client that working drawings would be required for permitting and would serve as an invaluable tool to keep everyone aligned. We handle all drawing work in-house and begin by documenting existing conditions. While I was on site taking measurements for the as-built, I noticed several recent upgrades, including new windows and fresh siding. A pressure-treated 2×8 deck ledger had also been installed—but there was no deck.
Soon after work commenced, the homeowner asked about adding the deck, prompting a closer inspection of the existing ledger.
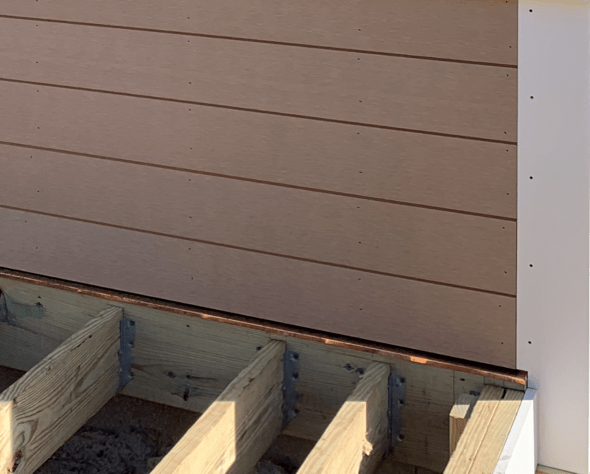
In this case, the ledger had been fastened directly to the wall sheathing over a strip of tar paper and secured to the rim joist with randomly placed spikes. A plastic ledger cap sat atop the board, and the first course of cedar shakes started 1 1/4 inches above it. The configuration suggested the installer intended for 2×8 joists to sit flush with the top of the ledger and for the final deck board to bridge over the flashing.
In my view, that approach traps water, dirt, and debris. In addition, fastening through the ledger cap punctures it—inviting long-term water intrusion.
Common Ledger Mistakes
Over the years, I’ve encountered ledger installations that were far worse, including:
- Ledgers spaced off the wall with pressure-treated blocks
- Ledgers spaced with PVC pipe
In both situations, siding and trim end up trapped behind the ledger, making future repairs nearly impossible without temporarily supporting the deck and removing the entire assembly.
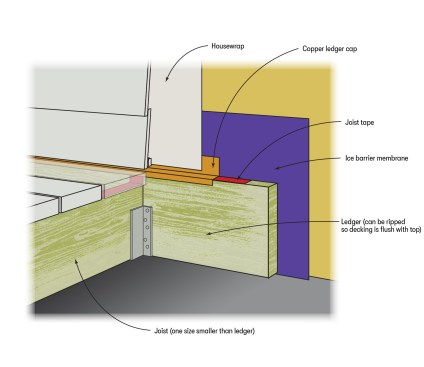
The author applies ice barrier membrane to the wall prior to installing the ledger board, then runs joist tape on top of the ledger and joist prior to installing the ledger cap.
A Reliable Installation Method
On this particular job, the deck was added later as a change order. With most of the siding on the deck wall already stripped for new windows and a door, removing the remaining siding and existing ledger made sense and allowed us to reinstall a new ledger using a method that has proven reliable for more than two decades.
This method is simple, logical, and—when executed correctly—virtually eliminates the chronic water issues that plague many decks. There are four main steps:
Prepare the Wall
Before installation, I always clean the wall sheathing—removing old fasteners, building wrap, and leftover flashing. I then snap a horizontal line roughly 17 1/2 inches up from the sheathing’s bottom edge. This establishes a reference for installing an 18-inch-wide strip of ice-barrier self-adhering flashing membrane, wrinkle-free, behind the ledger. (I used Grace Ice & Water Shield on this project, and on most others, because of its adhesion characteristics and because its split-release rip cord makes it easy to remove the release liner and to install the membrane wrinkle-free.)
Establish Ledger Height
On the job at hand, I struck a level line 4 to 6 inches below the new door sill to mark the top of the ledger, which will also correspond to the top of the finished deck. The proposed deck was 10 feet wide by 12 feet deep with 5/4 composite decking as the finished surface. To limit deflection and bounce over that span, I selected 2×10 joists and paired them with a 2×12 ledger. (As a rule of thumb, I size the ledger one nominal dimension deeper than the joist). We cut the ledger to length and secured it directly over the ice barrier with two appropriately sized LedgerLok screws (fastenmaster.com) in each joist bay—strategically placed to avoid the deck joist layout and related joist hangers. Some may say two screws per bay is excessive—and I agree in principle—but I stand behind this method because it helps maintain a plumb, stable ledger, especially when working with lumberyard-delivered stock or when shimming is required.
The author uses a ledger board one dimension larger than the joist size and drops the joists so the deck boards align flush to the top of the ledger.
Lay Out Joists and Decking
I start the layout by marking the top of each joist on the ledger. For 5/4 composite decking, I snap a line approximately 1 ⅟₁₆ inches down from the ledger’s top edge and install joists so their top edges align with that line. This creates a flush plane between the finished decking and the top of the ledger.
For 3/4-inch decking, I drop the joists 3/4 inch below the ledger top. I also maintain a ⅛-inch gap between the final deck board and the ledger cap to allow for drainage. Once siding is installed, about 3/4 inch of the ledger flashing remains visible.
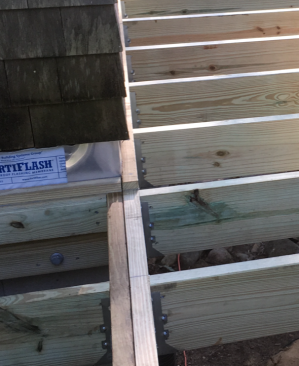
Flash and Lap Properly
I start with joist tape, which a lot of builders today use on deck framing. When doing so, I not only run the tape along the top edges of the joist, but also run it up the ledger and then up the wall behind the ledger cap. This bridges the joist-to-ledger joint and helps direct water away from the joist end grain. I also run tape down the top edge of the ledger.
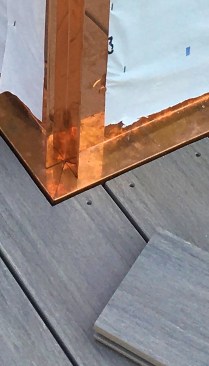
The finished result: The copper ledger cap aligns with the top of the decking. (Note: The copper corner flashing is a different detail that will be addressed in a coming article.)
My preference for a ledger cap is copper flashing for durability and appearance. In my experience, plastic ledger cap doesn’t hold up well over time. Regardless of fastening method, it tends to become brittle, and cracks or deforms over time. Galvanized metal may perform better by comparison and is serviceable in many applications, but in high-exposure areas—including coastal areas like here on the Cape or anywhere with persistently wet conditions—I view it as a long-term weak point. In addition, unlike plastic and copper, galvanized ledger cap is not an off-the-shelf offering in my area. Copper has proven to be the most durable option in wet environments, which is why it remains my go-to.
I install the ledger cap over the ice-barrier membrane and atop the ledger so it gets lapped by housewrap and siding. I leave a 1/4-inch gap between the bottom of the siding and the ledger cap to prevent moisture wicking.
Why It Matters
Deck ledgers are deceptively simple components that often determine the long-term success or failure of a deck. Poor detailing can lead to trapped moisture, hidden rot, and structural compromise. A properly installed ledger—with clean substrate, correct flashing, and precise fastening—will perform reliably for decades.
The extra time spent on proper prep and detailing is minimal, but the payoff in durability and safety is substantial.