When I was younger, I worked in a restaurant and learned that sharp knifes were essential to being productive. It’s the same with carpentry— dull edges make for poor results. In my experience a dull chisel, planer blade, or saw blade can also be dangerous. Having to force the tool to do the work can lead to an uncontrolled outcome where part of you ends up catching the misdirected tool.
The beauty of the digital world we live in is that all the knowledge of other craftsmen is available through a simple online search. A search for “how to sharpen a chisel” brings up hundreds of articles and videos, each with its own twist. The problem with all of this advice is that it can be overwhelming and often provides far more information than most of us need. So, in this article I want to keep things simple enough that people who are new to sharpening will have some easy first steps to get them started.
Most carpenters will need to mortise out a lock set or striker plate at some point. For this you will need a set of chisels, so let’s start there.
Types of Chisels
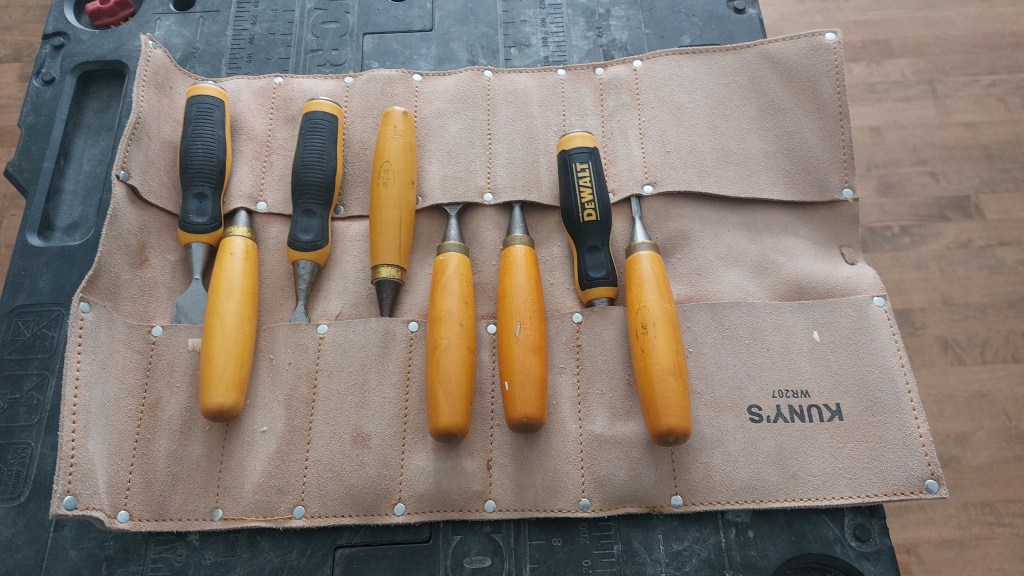
The two types of chisels I carry in my tool roll are bench chisels and butt chisels. A bench chisel usually has a longer, all-wooden handle. The length allows for control with two hands, but to prevent damage to the handle it should not be struck at its end with anything other than a wooden or rubber mallet. Think finer work, less brute force.
Butt chisels have shorter handles and metal or hardened plastic ends. The reduced handle length gets you into tighter spaces and the tougher end cap can take repeated blows from a hammer. Handy when you are done asking nicely and need to get through that wood grain.
Whichever type you carry, I recommend protecting the edges by storing chisels in a roll (see lead photo) or by putting protective caps on their business ends. There is no sense in sharpening your tools and then throwing them in a bag or box where they can get dulled or chipped by bumping against each other or other tools.
Understanding Bevels
The bevel is the angle of the blade end. Out-of-the-package general carpenters’ chisels will usually come sharpened to the most common bevel.
Bevels for woodworking chisels range from 20 to 30 degrees, with 25 degrees being the most common. This angle is a middle ground between a thinner carving or paring tip (20 degrees) and a thicker end like that used in timber-framing chisels (30 or more degrees). The thinner the end, the finer the work, but also the more prone that end is to chip or wear. A blunter end, as with the 30-degree (or more) bevel of a timber-framing chisel, makes the tip more resistant in heavy work but will not work well for detail.
We can refine this even further by adding a micro bevel to the chisel. This for me is the full “have my cake and eat it too” option. When sharpening, I set the full face of the tool to 25 degrees and then do a few passes on the finest grit stone at two to three degrees steeper, but just on the first ¹/₁6 inch of the leading edge. The other advantage in having this micro bevel is that a quick tuneup back to sharp is easier. So as long as the blade is not too dull or chipped you do not need to work the full face of the tool at 25 degrees back to sharp; you need only work the leading edge at the steeper 30 degrees.
Sharpening Tools Needed
Marc Forget
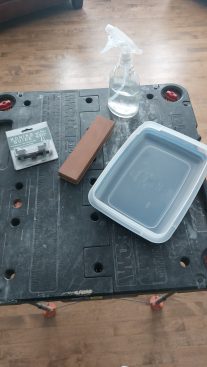
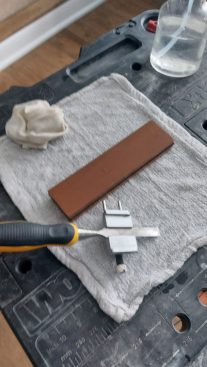
A Honing guide, a stone and some water are all you need to start.
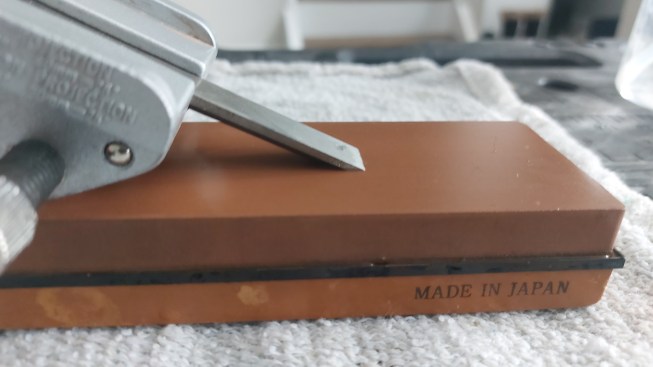
This brings me to what you need for sharpening. For just starting out I would go with a combination water stone. These have two levels of grit, one on each side, which is why they are called combination stones. They use water as the lubricant and are the cheaper option of the many types available.
And oh my, are there a lot of options out there! What I said at the beginning of this article about the amount of advice you can get certainly holds true for types of sharpening systems as well. If you are turning wood on a lathe, carving, or doing joinery work, then advancing your sharpening knowledge and the equipment to do it with makes sense. This is a first-steps article, though, and for the general finish carpentry I have done, my water stone with its 1,000- and 4,000-grit surfaces has served me well. A small note of advice: If you live in a cold climate, be sure to store your water stones inside. A wet stone will crack if frozen.
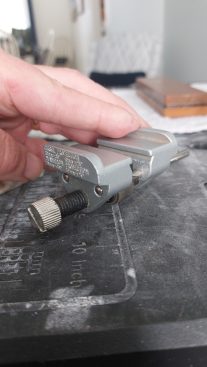
The one other piece of hardware you need for getting started is a honing guide. Think of it as training wheels for sharpening. This is a jig that holds your chisel or planer blade at a constant angle as you pass the blade across the stone. By having the bevel set by this jig as you work the tool, your chances of not achieving a consistent angle are almost zero. The final advantage of doing all of this by hand as opposed to using a powered sharpening system is that you can stop before you do something to your chisel that would be difficult to reverse.
How to Sharpen
Now for the actual sharpening. For a water stone you want the stone to be saturated with water before you start. Immersion for 10 to 15 minutes in a tray of water—I use a Tupperware container—does the trick. The container, when emptied of water, also serves as storage for the stone when not in use. I allow the stone to dry out and then wrap it in a clean dry rag and put it in the container when I am finished. This way it is somewhat protected from being banged about while sitting on the shelf. Any of these stones can be cracked or chipped if mishandled.
Marc Forget
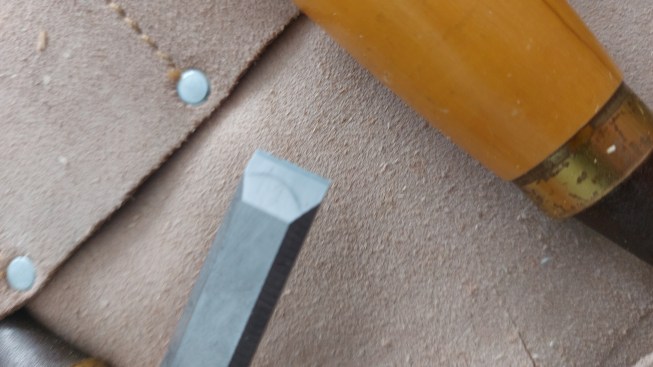
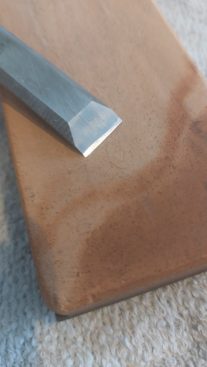
This chisel has a nicked and rough leading edge. Time to get thi…
I set the stone on a damp cloth on the surface of a work bench or countertop. There are holders that you can buy that will keep the stone from moving as you work, but the cloth works fine for me. Before dealing with the bevel, I run the back of chisel across the stone to true it up. This ensures that the back is flat and allows for a truer bevel angle. If the back is not flat and has some amount of angle to it, then you will get some amount of compounded angle on the front face. I do this ten or twelve times across the entire stone, adding water and wiping away any metal fines and/or stone grit that appear on the stone.
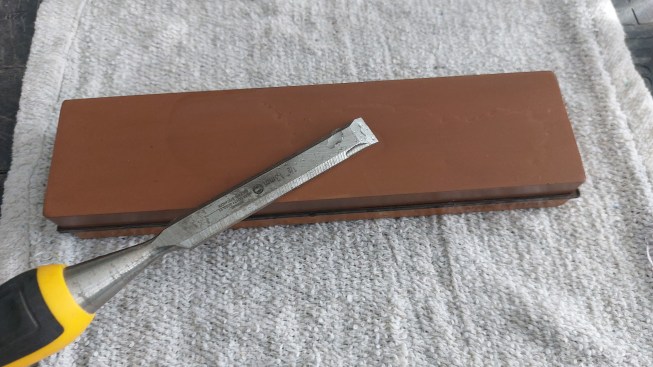
Then I put the chisel into the honing guide at the bevel angle I want. For my guide that angle is set by how far the chisel protrudes from the front of the guide. The more it protrudes the shallower the angle. So for my guide 1 ⁵/₈ inches is 25 degrees and 1 ³/₁6 inches is 30 degrees. Other guides have set screws that adjust the angle. When in doubt, follow the directions.

Marc Forget
On this guide, the bevel is set by the amount of projection. One…
If the chisel is very dull then I will start by sharpening the full face of the bevel at 25 degrees, running it back and forth across the whole stone on the 1,000-grit face. How many times depends on how much is needed to get back to sharp. Every ten or so passes I check the edge with a piece of paper to see how sharp it is. I wet the stone as I go, and if the blade doesn’t glide on the stone I add more water. When the tool is as I want it, I then flip the stone over, readjust the honing guide to 30 degrees, and make passes along the stone until I have a polished leading edge on the blade ¹/₁₆ inch back from the tip. If the chisel is not too bad or if I just want to prep it for some finer work, I will only do this last step on the 4,000 grit to reestablish the micro bevel on the leading edge.
The beauty of sharpening by hand is that you can adjust as you go. You can remove more steel if you need to or stop at any time. A powered sharpening system moves much quicker but can take away more than is needed before you have a chance to stop. When working by hand there is little chance of mucking up your angles and damaging the tool or stone. The downside is that it is slow, so if you need to sharpen a lot of chisels you will be at this for a while. I found that by making time to do short sessions frequently I spend less time overall. Frequent touch-ups are easier than waiting until the tool is very dull. When it gets to the point of very dull you are going to spend much longer getting the chisel back to what you need.
If you want to get past the basics there are a number of books that never go out of date. Two that I like are “A Sharpening Handbook” by Richard D. Wile and “The Complete Guide to Sharpening” by Leonard Lee. There is also the internet but be prepared for a flood of ads for equipment. Whether you keep things simple or get further into other techniques, a sharp tool is a joy to use and will help produce better results.
Keep the conversation going—sign up to our newsletter for exclusive content and updates. Sign up for free